Single node Dask on Google Cloud Platform

Recently I’ve been doing lots of local model development on my measly 4-core Macbook Pro. While the data I’m working with fits in memory just fine, I have some sporadic, compute intensive workloads where I could benefit from having more cores. Things like big grid searches, or expensive feature development pipelines that could be easily parallelized. Rather than moving my entire workflow & development environment to the cloud, I would rather be able to periodically send computationally expensive tasks to somewhere with more computing resources. Wouldn’t that be magical?1
Enter Dask. Dask is easy parallelism. You have a scheduler and a bunch of workers. You submit tasks to the scheduler and it automatically distributes the work among the workers. It works exceptionally well on a single machine, and can scale out to large clusters when needed. For cloud-based cluster deployments, their docs have a dedicated section covering all your options. Additionally, Jacob Tomlinson put together a nice write up on the current state of distributed Dask clusters a few months back.
Despite the plethora of options, I couldn’t be bothered with all the setup involved to get a Dask cluster up & running, in particular: figuring out the nuances of exposing the scheduler to the external network (which involves learning Kubernetes). With Google Cloud Platform’s (GCP) Compute Engine offering machines with 60 CPUs, I realized I could just spin up a single machine running a dask-scheduler process & a bunch of dask-worker processes, and get all the compute I could realistically ever need 2.
Making it happen
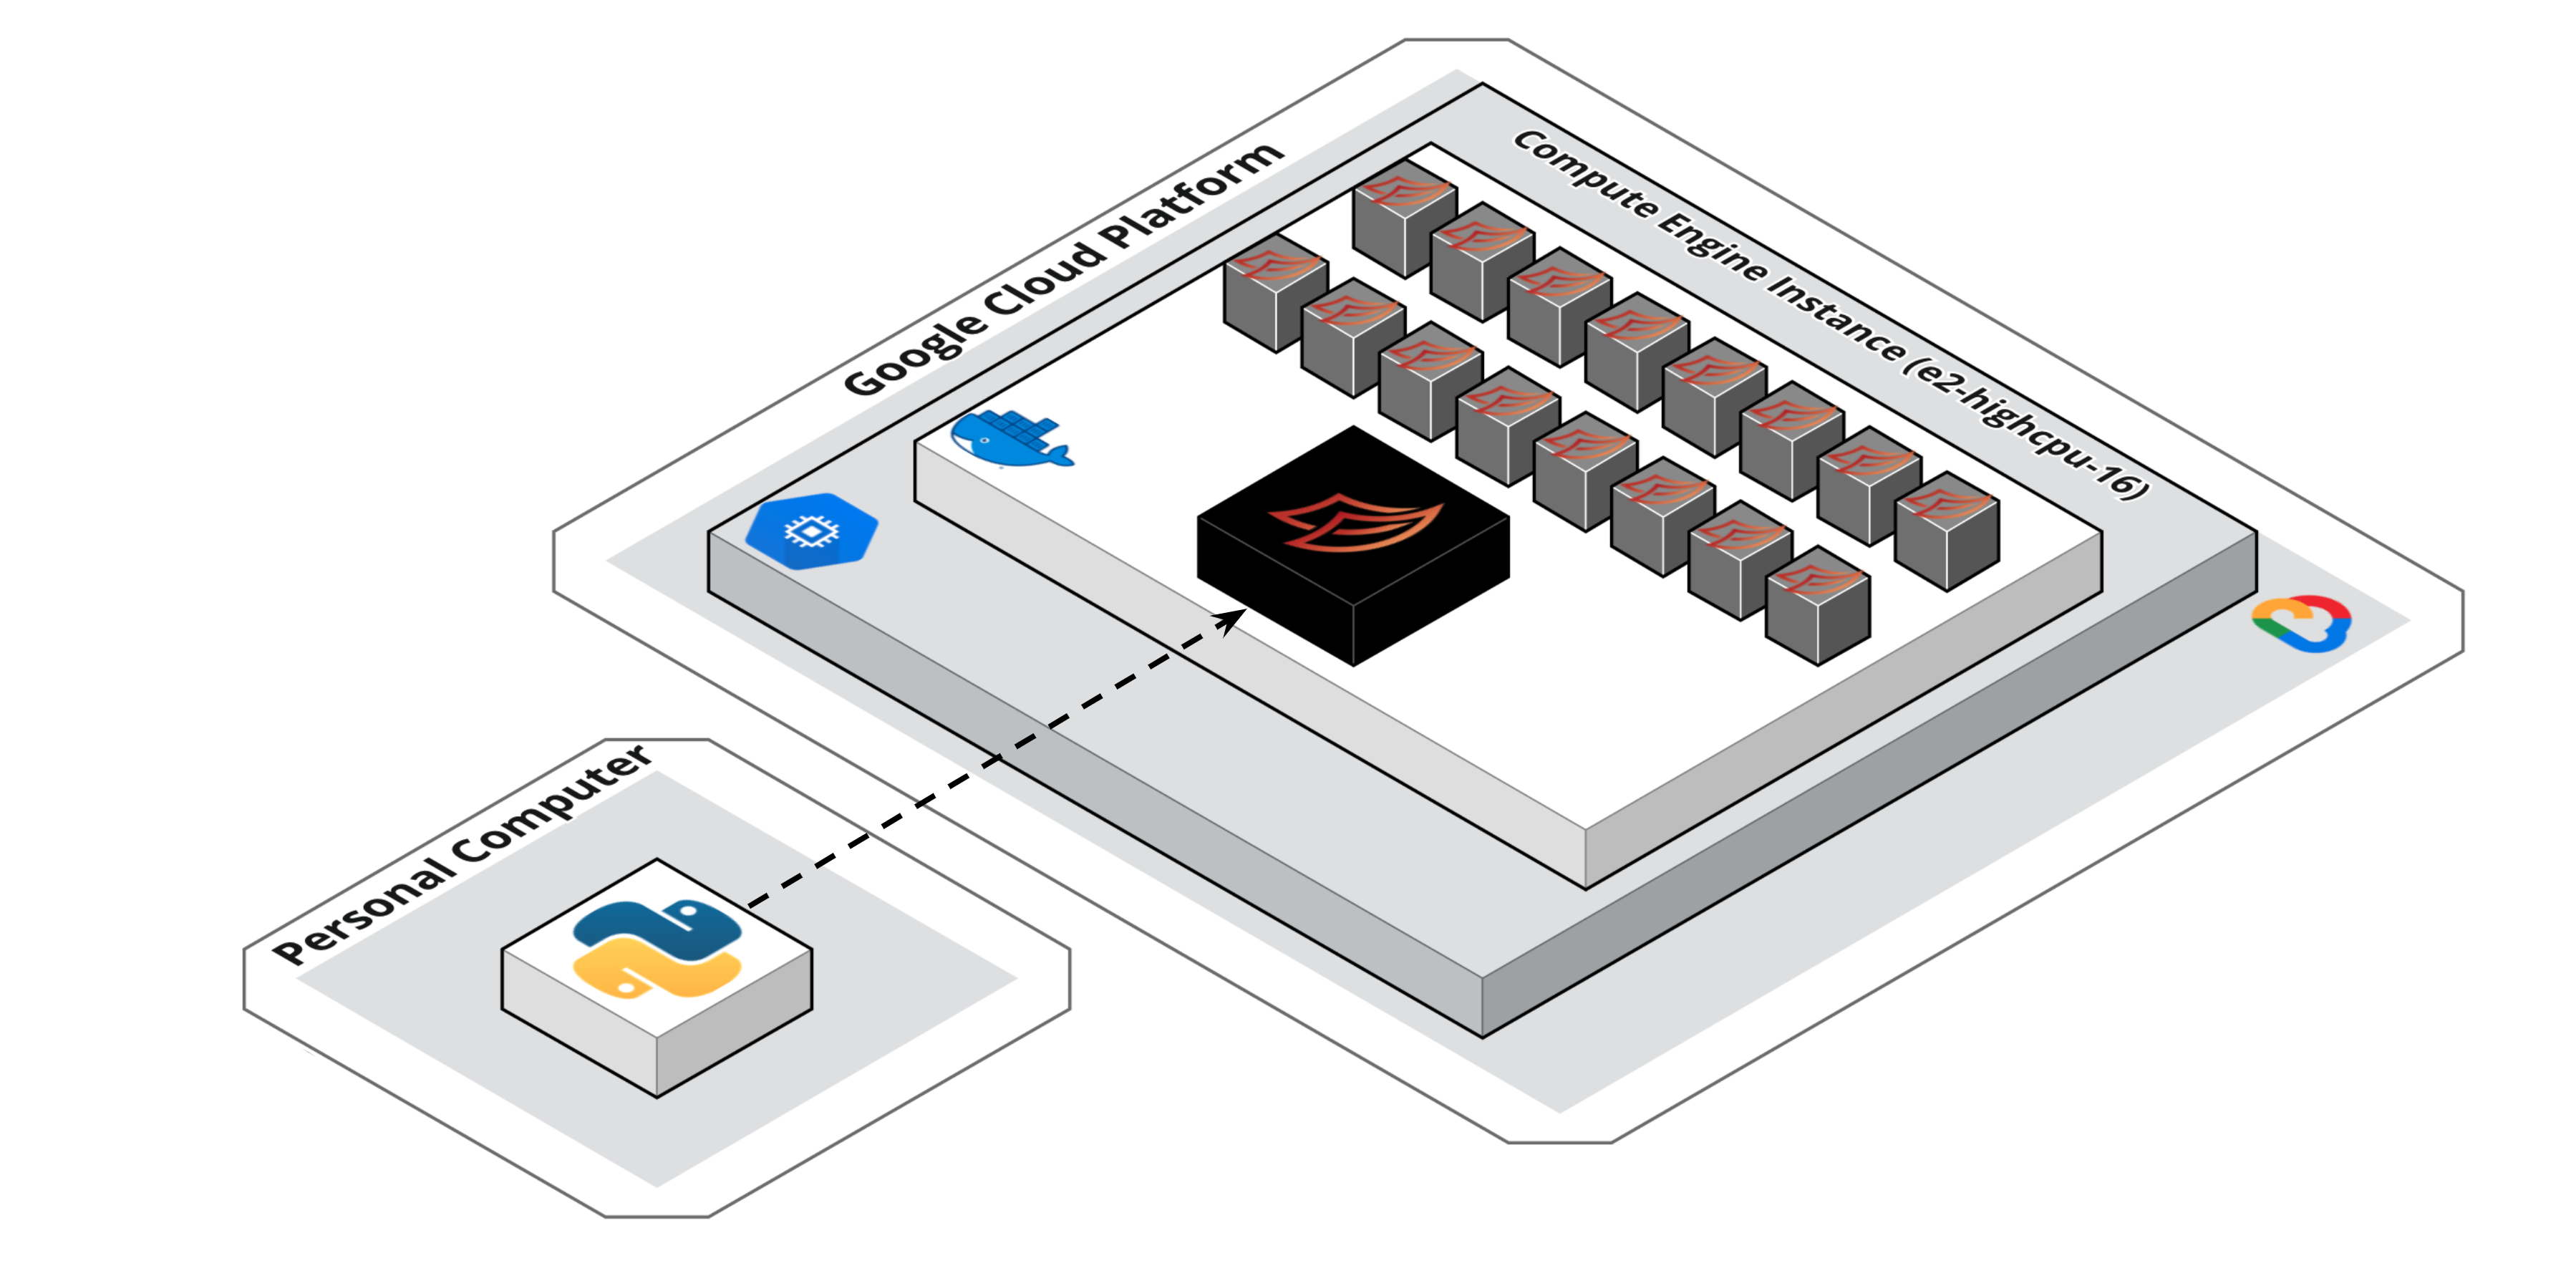
Our end goal is to get something like this:

We’ll have a single Compute Engine instance (with 16 vCPUs) running in GCP. The instance will be running a single docker container which contains our dask-scheduler process & dask-worker processes. Our local Python session/development environment can then send tasks to this single node cluster for much faster execution.
Why docker? From Jacob’s article I mentioned above:
Lastly the Python environment in the Python session where you create your Client must match the Python environment where the workers are running. This is because Dask uses cloudpickle to serialize objects and send them to workers and to retrieve results. Therefore package versions must match in both locations.
Docker is one of the best ways to guarantee your local environment will match your remote environment exactly. Additionally, Compute Engine comes with a nice & simple option where you can automatically launch a docker container when your VM starts.
The details
The Dockerfile I am using builds off the python:3.7.6-buster 3 image and sets up my Python environment based on my Poetry virtual environment configuration.
The real magic happens in the dask-entrypoint.sh shell script that gets kicked off whenever the docker container is run. This scripts starts the dask-scheduler process and bunch of dask-worker processes (defaults to the number of cores available) in the background. All their logs are piped to a centralized logging file, which is then streamed indefinitely with tail -f log.txt4.
#!/bin/bash

set -x

# Some cluster configuration details left out here...see full scripts for details
# https://gist.github.com/ian-whitestone/d3b876e77743923b112d7d004d86480c

# Start the dask scheduler & workers
echo "Starting dask-scheduler"
poetry run dask-scheduler > log.txt 2>&1 &

echo "Creating $num_workers dask workers"
for i in `seq $num_workers`
do
    poetry run dask-worker \
        --nthreads $threads_per_worker \
        --memory-limit "${memory_per_worker}GB" \
        127.0.0.1:8786 > log.txt 2>&1 &
done

tail -f log.txt
Before you can start spinning up machines in GCP, you will need to go through some basic setup. You can follow steps 1-4 in this guide. For my use case, I ended up using the gcloud CLI to spin up my machine 5. To create the compute engine instance, you can run this gcloud command:
gcloud compute instances create-with-container dask-cluster-instance \
    --zone=us-central1-a \
    --machine-type=e2-highcpu-16 \
    --tags=dask-server \
    --container-env=MEMORY_PER_WORKER=1,THREADS_PER_WORKER=1 \
    --scopes=https://www.googleapis.com/auth/logging.write,https://www.googleapis.com/auth/monitoring.write,https://www.googleapis.com/auth/trace.append \
    --container-image=registry.hub.docker.com/ianwhitestone/domi-dask:latest
Note, you’ll need to have your docker image available in a place accessible by the Compute Engine instance. You’ll also need to make sure your instance will accept external traffic on ports 8786 and 8787 (the default ports for the dask scheduler and dashboard). To accomplish this, I added this new firewall rule which gets automatically applied to all instances with the tag dask-server:
gcloud compute firewall-rules create allow-dask-http --allow tcp:8786-8787 --target-tags dask-server
Demo Time
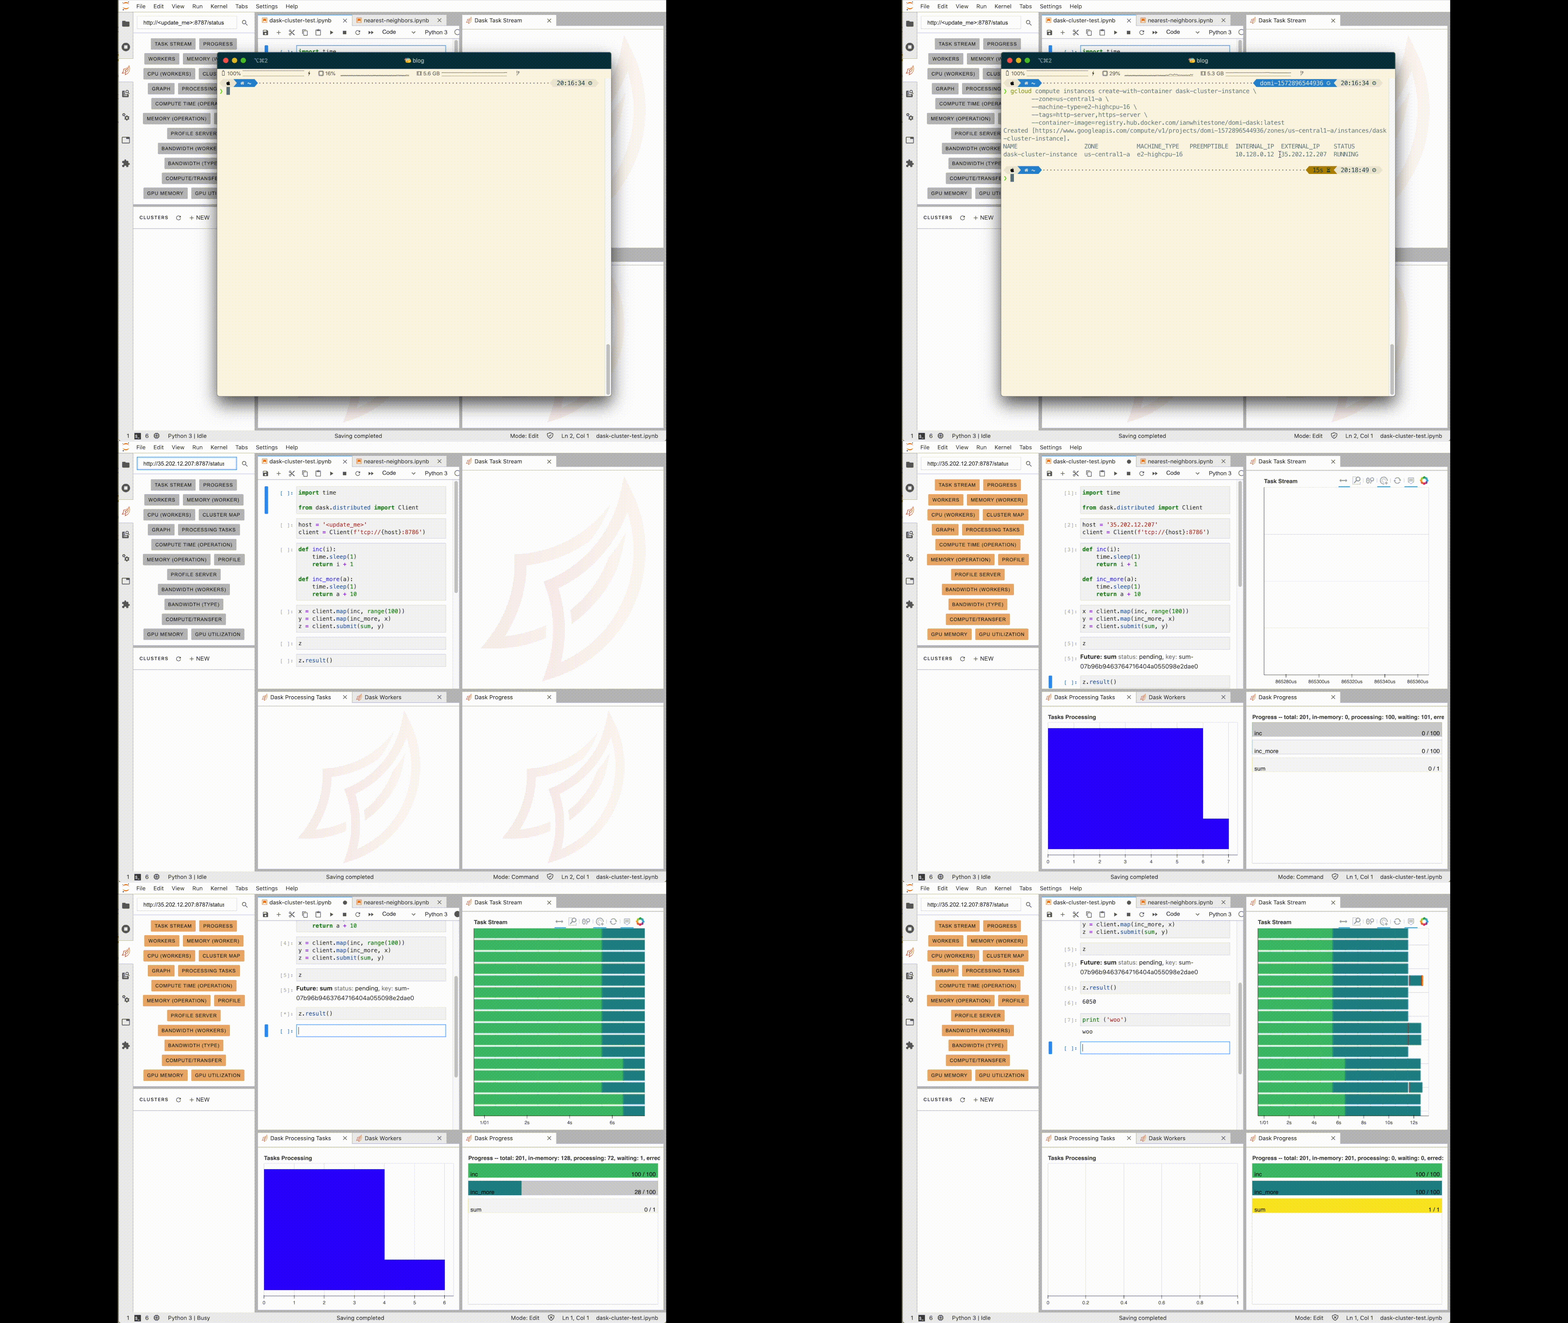
Here’s what it looks like in action:

What’s going on here?
- Spin up the Compute Engine instance using the CLI. This takes ~15 seconds, then you’ll need to wait another minute or so for the docker container & dask processes to get kicked off.
- I connect the cluster to the dask jupyter lab extension so I can view my cluster diagnostics without opening a separate window/tab (literally works like magic ✨).
- I connect my Python session to the cluster with
Client('tcp://<machines_external_ip_address>:8786). - I send some work to the cluster, it automatically distributes it among the workers (processes in this single node cluster), then sends back the results.
- Profit
Pretty simple & works like a charm. You can later tear down the instance easily with:
gcloud compute instances delete -q --zone us-central1-a dask-cluster-instance
Pitfalls and Caveats
It’s not all sunshine and roses6. A few things worth mentioning:
- In the motivation section I described how I wanted to keep working locally, but ocassionally send tasks to the cloud for computation. This means that any data being used in your functions must get sent to the cluster. If your dataset is large, you’ll want to consider sticking it in cloud storage, and then having the dataset get read in by the cluster in your first step of the task graph.
- The “launch with container” feature on Compute Engine is not available via the API, meaning you can’t easily do things like programatically spin up a cluster in pure Python like they do in this example.
- Update: You can still accomplish this if you’re willing to deal with potentially breaking changes. See this post for more details.
- Authentication & security. With the example described above, literally anyone could start executing commands in my cluster. I’m okay with this for a few reasons. One, my cluster is usually up for an hour or two whenever I want to run something, then I tear it down. Two, both my docker container and the Compute Engine instance have access to nothing. No environment variables or credentials baked into the docker image, and the instance only has access to write logs (see the
--scopesargument above). Nonetheless, I cannot recommend doing this to anyone. To add more security you can leverage Dask’s builtin support for TLS/SSL.- Update: see how to solve for this in my follow up post.
Notes
1 I may also have $400 in GCP credits I feel obligated to burn through in the next 30 days…
2 While in the Google Cloud free trial, you’ll run into a “CPU quota exceeded” error if you try and spin up a machine with a lot of vCPUs. As per their documentation here, this is designed to prevent you from accidental usage ($$$). Once you’re on a full account, you can easily request a quota increase to be able to use such machines.
3 According to this article, buster was listed as one of the better options for Python docker images.
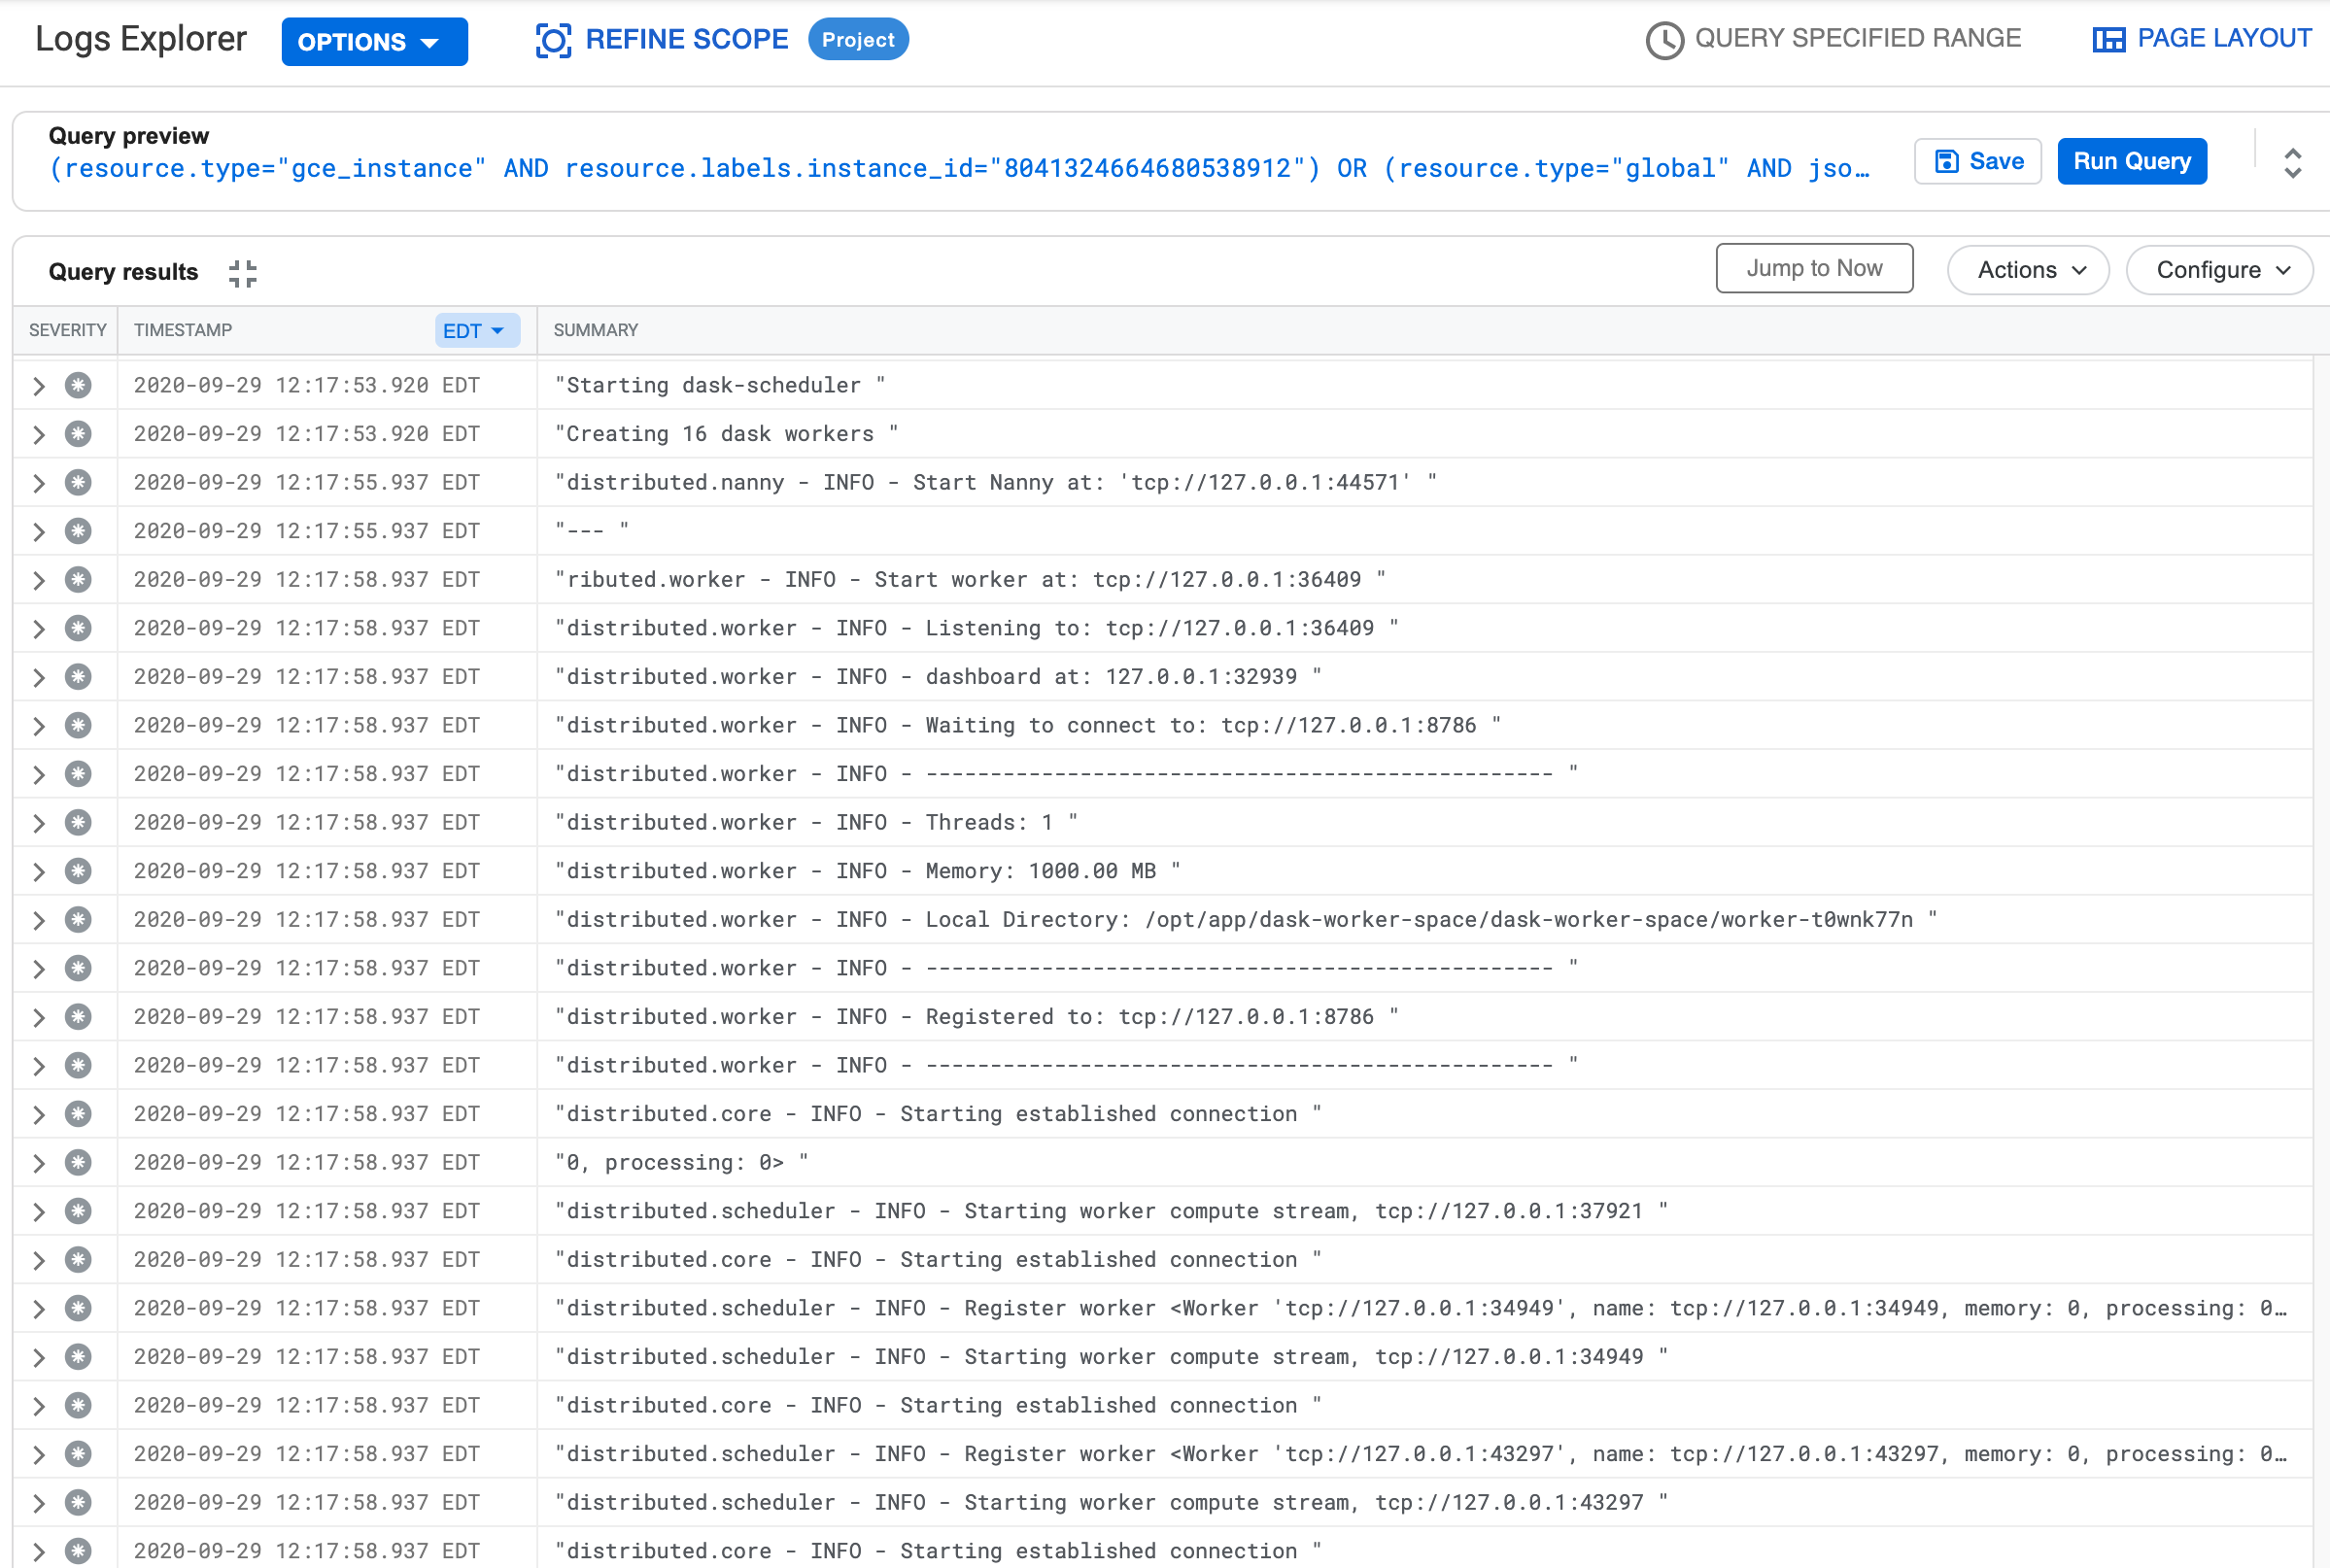
4 This is done so all yours logs easily viewable in GCP. They will look something like:

5 To avoid specifying the GCP project with each command, I configured the default project with gcloud config set project <project_id>. You can use gcloud projects list if you don’t know your project ID.
6 Pretty damn close.